Let's draw multiple points
In the last chapter you must have noticed that we had hardcoded the gl_Position to vec4(0,0,0,1) in the vertex shader, but now you want multiple points at different places, so we need to give the vertex shader an input telling that draw the first point here, the next there and so on. These vertex shader inputs are called attributes.
What are attributes
Any input given to the vertex shader can be termed as attribute, and here we will use attribute to pass the position of points.
Let's see how to use them
// vertex shader
const vertexShaderSource = `#version 300 es
in vec2 a_position;
void main(){
  gl_Position = vec4(a_position,0,1);
  gl_PointSize = 30.0;
}`;
You may notice that we have added a new line, in vec2 a_position;, in the shader.
The in keyword tells the shader that this variable will receive data from outside the shader. In simple terms, it works in the opposite way of the out keyword.
in→ used to get data into the shader from outsideout→ used to send data out of the shader
Recall that in the previous chapter, we used the out keyword in the fragment shader to output the final color.
The variable name a_position follows a common naming convention. The prefix a_ simply stands for attribute, which helps us easily identify that this value comes from vertex attribute data.
Moving on to the statement that sets gl_Position, which might confuse you:gl_Position = vec4(a_position, 0, 1);.
At first glance, it may seem strange that the vec4 constructor accepts a vec2 as its first argument, followed by 0 and 1. What’s actually happening is that this is just a shorthand form. The line above is equivalent to writing:
vec4(a_position[0], a_position[1], 0, 1)
GLSL provides many such shorthand (and convenience) constructors to make the code shorter and more readable. We’ll explore these shorthands in more detail in later chapters.
Now the question arises how to give input to the vertex shader.
Steps to give input to the vertex shader
- Make a JS array of the coordinates of points
- Get the location of the attribute
- Create Buffer
- Bind Buffer to the target
- Insert data into the buffer
- Tell the GPU how to read the buffer
- Enable the attribute
- Issue the draw call with the number of vertices you want to draw.
The code we are discussing in this section will come after the linking of the program.
Now let's see each step in detail:
1. Make a JS array of the coordinates of points
First of all you need to define an array containing the coordinates of all the points you want to be drawn on the screen.
Code:
const pointsCoordinates = [
  0.0, 0.5, // First point
  -0.5,-0.5, // Second point
  0.5,-0.5, // Third point
];
The WebGL coordinates system extends from -1 to +1 on each axis hence the points are within that range, we will have a good discussion on WebGL coordinate system in the chapter coordinate space.
2. Get the location of the attribute
The next step is to get the location of an attribute in the vertex shader.
But what does location actually mean?
You can have multiple attributes in a vertex shader as shown below:
in vec3 a_position;
in vec3 a_color;
in vec3 a_normal;
The attribute names (a_position, a_color, a_normal) are only for readability.
Inside the GPU, attributes are not identified by their names, but by numeric
values called attribute locations.
During program linking, WebGL assigns a number (such as 0, 1, 2, …) to each
attribute, and these numbers are the attribute locations.
Now the question is: Why do we need the location in the first place?
Let's answer this, from the example above you can see that there can be more than one attributes or inputs in the vertex shader and hence to identify a particular attribute and pass data to that attribute, we need its location.
To get the location of the attribute we invoke the function gl.getAttribLocation with the first arg being program and the next arg is the name of the attribute.
Code:
const a_position_location = gl.getAttribLocation(program, "a_position");
3. Create a Buffer
The first question that arises is: what is a buffer?
A buffer is a block of memory used to store data that can be accessed by the graphics pipeline during rendering. It usually resides on the GPU, but at this point it is just a reference in the WebGL system.
Why do we need it?
The vertex or coordinate data we defined as a JS array exists in the system RAM. For rendering, the GPU needs access to this data. To make it usable by the GPU, we create a buffer object.
We invoke the function gl.createBuffer(), which creates a buffer object in the WebGL system and returns its handle (reference). At this point, GPU memory is not yet allocated; the buffer object just exists as a placeholder.
Code:
const pointsBuffer = gl.createBuffer();
It would be more clear with the diagrams below:
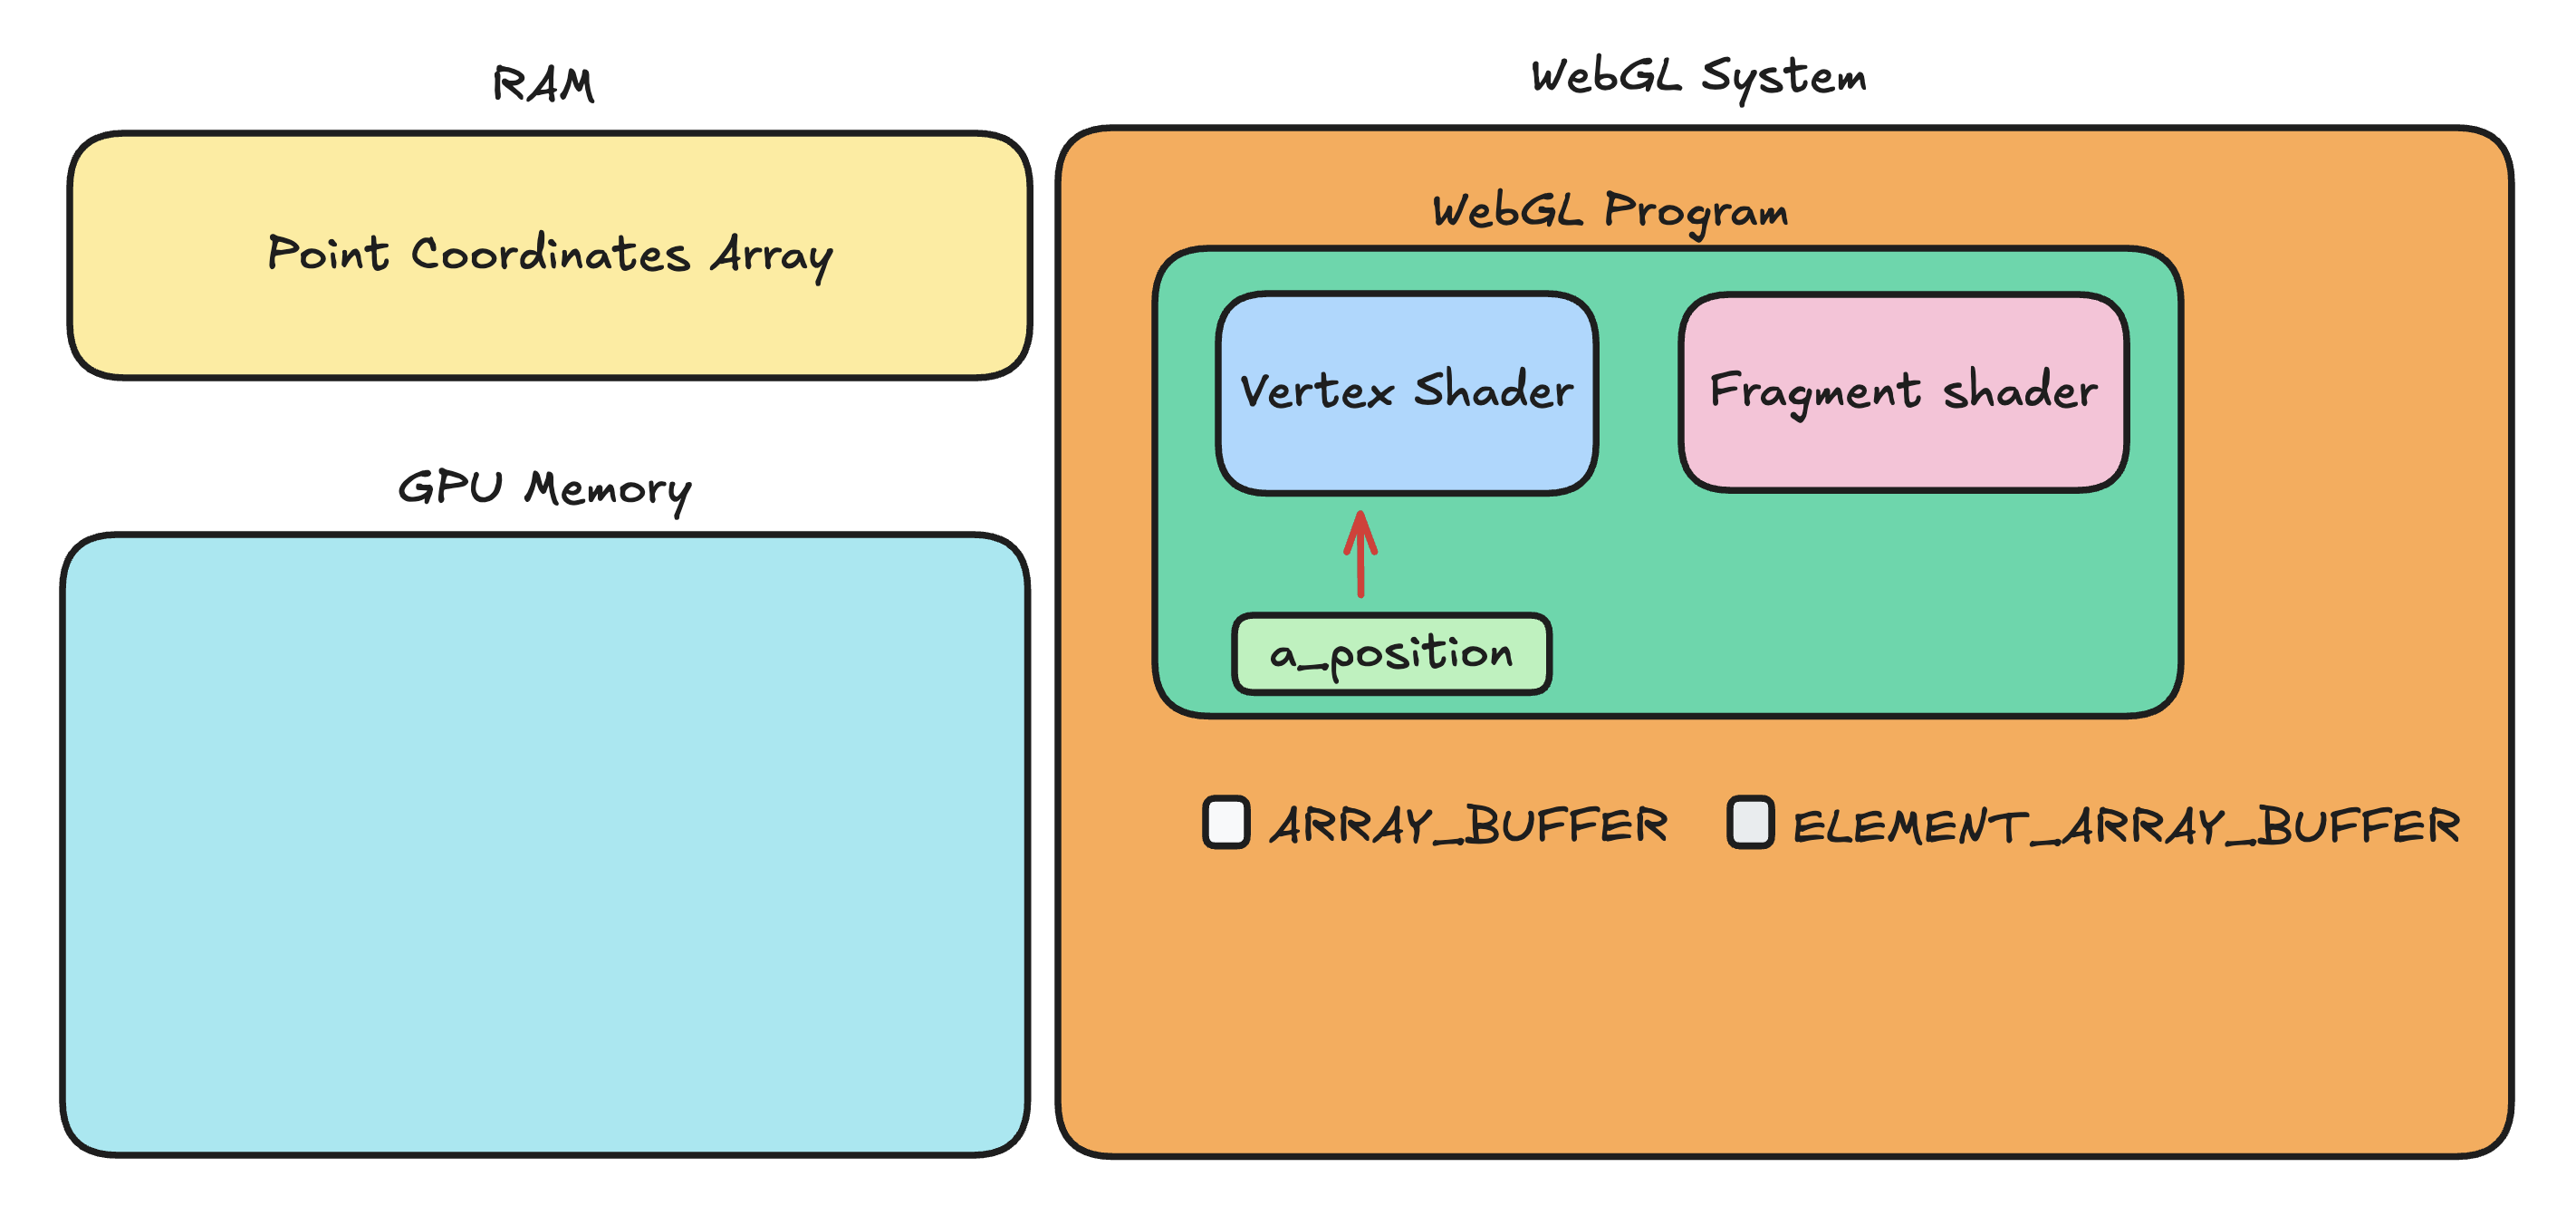
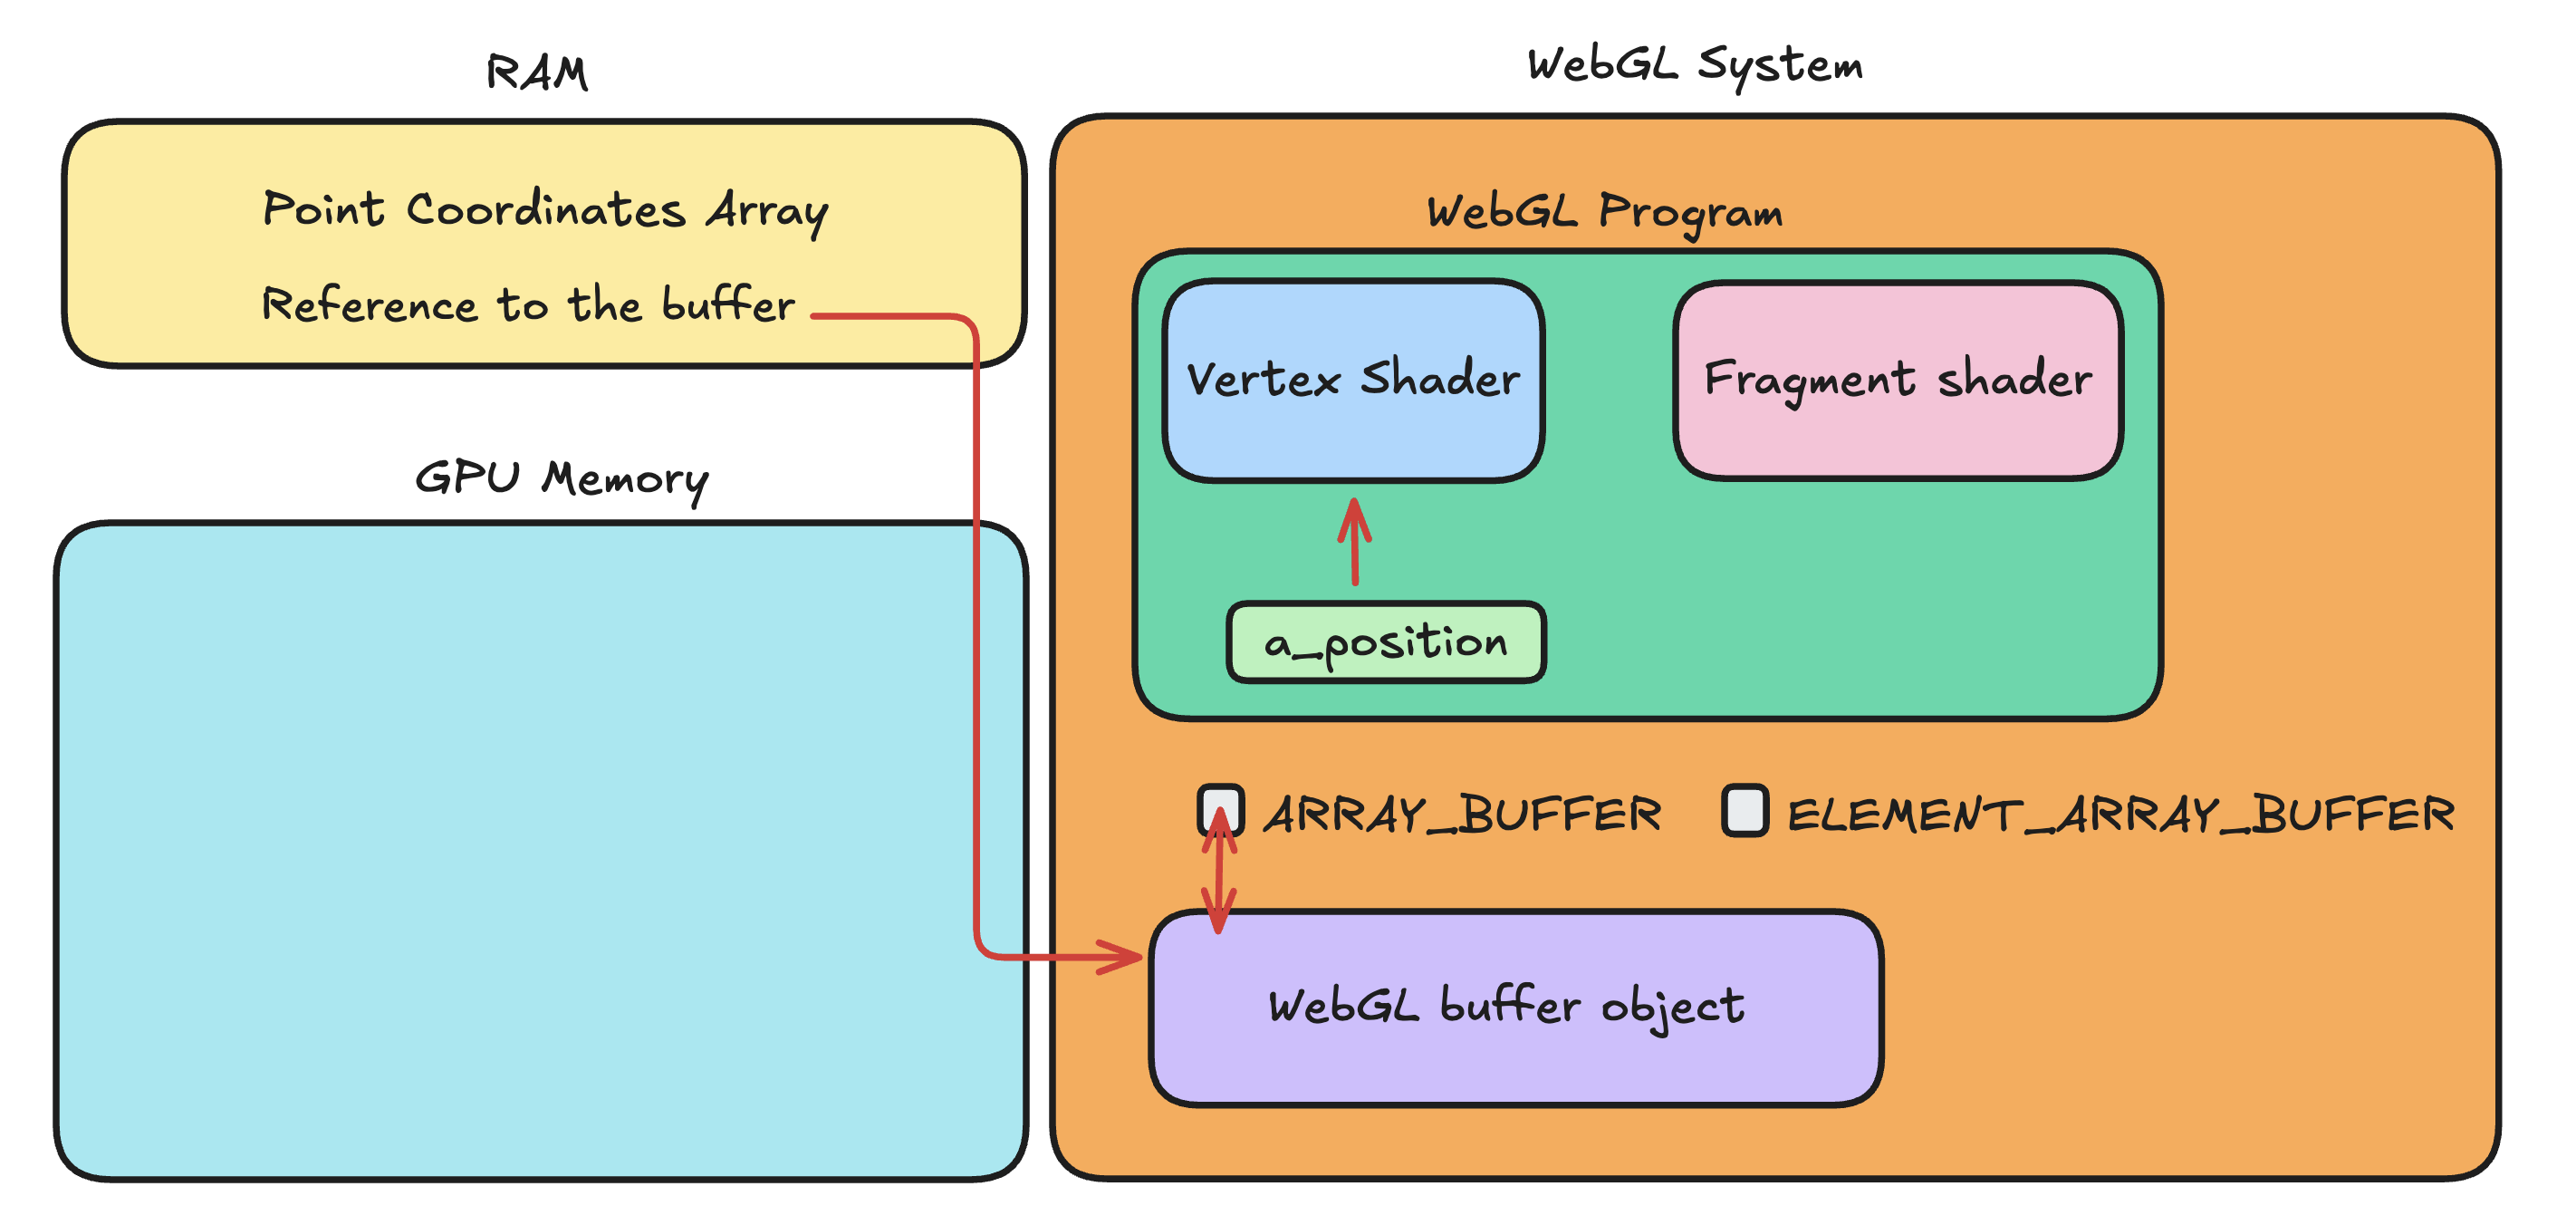
Note: These arrows mark which variable points to which location and don't worry about the ARRAY_BUFFER and ELEMENT_ARRAY_BUFFER we will discuss it in the next point
4. Bind Buffer to the target
In WebGL, buffers are bound to targets, which define how the data inside the buffer will be used.
WebGL mainly uses two buffer targets, each with a different purpose.
ARRAY_BUFFER
This target is used to store attribute data.
Attribute data includes per-vertex information such as:- positions
- colors
- texture coordinates
- normals
The data stored in an
ARRAY_BUFFERis read by the vertex shader through attribute variables.ELEMENT_ARRAY_BUFFER
This target is used to store index data.
Index data specifies which vertices from theARRAY_BUFFERshould be used and in what order to draw them.This allows vertices to be reused and avoids storing duplicate vertex data. We will discuss more on this in chapter we make a 3D Cube.
Now as we have the point coordinates and we know that its an attribute so we will use the ARRAY_BUFFER as the target, and bind the Buffer object to this target.
Code:
gl.bindBuffer(gl.ARRAY_BUFFER, pointsBuffer);
Let's have a look at the system state after calling this function:
NOTE: Binding buffer to the target may not make sense to you right now but bear with me for some time we will discuss this in the chapter WebGL: State Machine
5. Insert data into the buffer
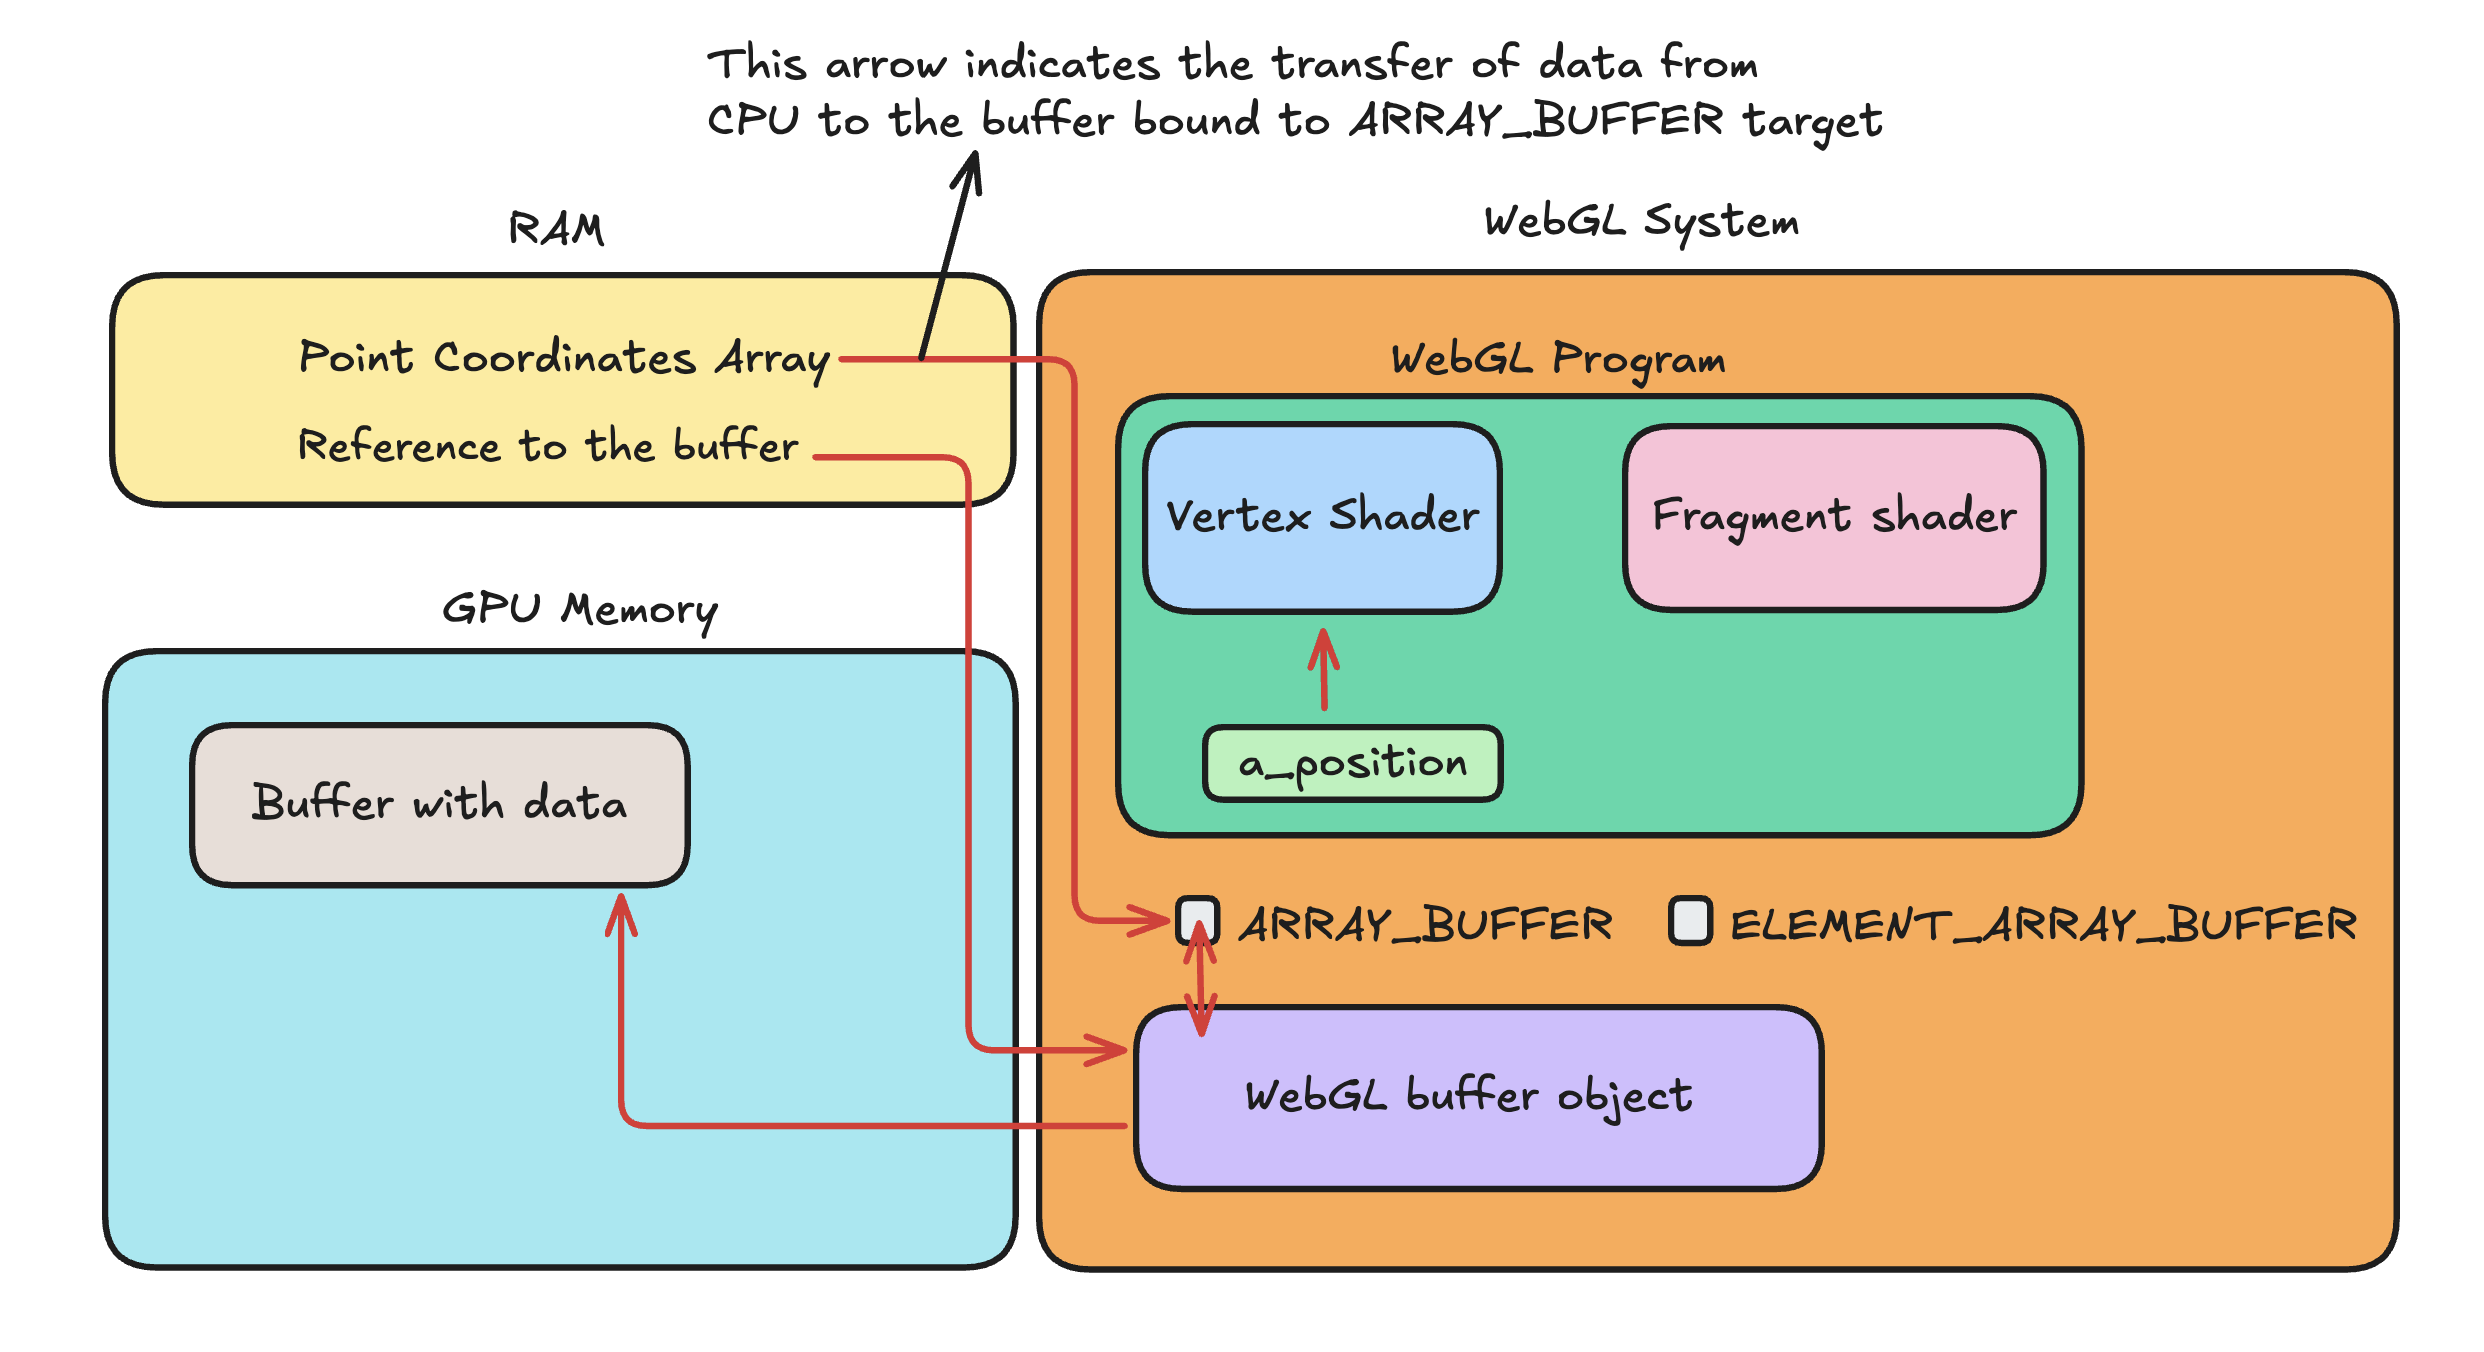
Once the buffer is bound to a target, we are all set to transfer data from the system memory
(RAM) to the GPU memory. This is done using the gl.bufferData function.
This function:
- allocates memory on the GPU to the currently bound buffer
- uploads data into that memory
gl.bufferData takes three arguments:
- the buffer target (
ARRAY_BUFFERorELEMENT_ARRAY_BUFFER) - a typed array containing the data
- a usage hint describing how the data will be used
You can think of this function as telling WebGL to copy the data from this array into the GPU buffer that is currently bound to gl.ARRAY_BUFFER.
Code:
gl.bufferData( gl.ARRAY_BUFFER, new Float32Array(pointsCoordinates), gl.STATIC_DRAW );
You might be wondering: what is Float32Array?
JavaScript arrays do not have a fixed data type. A normal JavaScript array can contain mixed values such as numbers, strings, or objects:
[34, "a", 5, "hello"]
The GPU, however, works only with numbers. It does not understand strings or mixed data types. In fact, GLSL does not even have a string data type.
Because of this, WebGL requires data to be sent in a typed format, where every element has the same data type and a known size in memory.
Float32Array is a typed array that guarantees:
- every element is a number
- each number is a 32-bit floating-point value
- the memory layout is predictable for the GPU
By converting the data into a Float32Array, we give the GPU a clear guarantee
about the type of data it will receive and how that data is laid out in memory.
There are other typed arrays as well (I copied this table from MDN docs ; )
| Type | Value Range | Size (bytes) | Web IDL type |
|---|---|---|---|
Int8Array |
-128 to 127 | 1 | byte |
Uint8Array |
0 to 255 | 1 | octet |
Uint8ClampedArray |
0 to 255 | 1 | octet |
Int16Array |
-32768 to 32767 | 2 | short |
Uint16Array |
0 to 65535 | 2 | unsigned short |
Int32Array |
-2147483648 to 2147483647 | 4 | long |
Uint32Array |
0 to 4294967295 | 4 | unsigned long |
Float16Array |
-65504 to 65504 | 2 | N/A |
Float32Array |
-3.4e38 to 3.4e38 | 4 | unrestricted float |
Float64Array |
-1.8e308 to 1.8e308 | 8 | unrestricted double |
BigInt64Array |
-2⁶³ to 2⁶³ − 1 | 8 | bigint |
BigUint64Array |
0 to 2⁶⁴ − 1 | 8 | bigint |
Of these we will be using only:
Float32ArrayUint16ArrayUint32Array
Moving on to the third argument of gl.bufferData which you can understand as a kind of usage hint to the GPU, it tells WebGL how you intend to use the buffer data.
This is only a hint to the GPU System — WebGL does not enforce it.
We commonly use two modes:
gl.STATIC_DRAW: Use this when the buffer data is set once and used many times for rendering.gl.DYNAMIC_DRAW: Use this when the buffer data will be updated frequently, for example changing the data every frame . It works on the Allocating First, Filling Later When usinggl.DYNAMIC_DRAW, you can first allocate memory on the GPU and then update it later usinggl.bufferSubData. This mode is mainly used in situations where the data is updated on the CPU and then rendered by the GPU, for example in particle simulations.
System state after invocation of the gl.bufferData function:
6. Tell the GPU how to read the buffer
After the step 5 the GPU has the buffer data, now we need to tell the GPU how to read data from that buffer. To do this we invoke the function gl.vertexAttribPointer. This function is a bit complicated so let's see the calling statement first.
gl.vertexAttribPointer(a_position_location, 2, gl.FLOAT, false, 0, 0);
It has a total of 6 args:
Attribute Location: This specifies which attribute in the vertex shader this buffer data will be used for.
Size: This says how many numbers make up one vertex, and in this example we know that each coordinate has two components, remember we used
vec2in vertex shader as the type ofa_position.Type: Data type of the numbers, here its float hence
gl.FLOAT.Normalized: This parameter has an effect only when the data type is an integer (such as
gl.UNSIGNED_BYTE,gl.BYTE,gl.SHORT, orgl.UNSIGNED_SHORT). When set totrue, the integer values are linearly mapped to a floating-point range ([0, 1]for unsigned types and[-1, 1]for signed types) before being passed to the vertex shader.
If the data type isgl.FLOAT, this parameter is ignored.Stride: Stride specifies the number of bytes between the start of one vertex and the start of the next vertex in the buffer. Applicable when more than one attribute in the buffer else you set it to 0
- If
stride = 0, WebGL assumes the data is tightly packed (no extra gaps between vertices). - If
stride > 0, it tells WebGL that each vertex contains additional data (like color, normals, etc.) and how many bytes to skip to reach the next vertex.
- If
Offset: Offset specifies the byte offset from the start of the buffer where the data for this attribute begins.
It is mainly used when multiple attributes are stored in the same buffer.- If
offset = 0, WebGL starts reading the attribute data from the beginning of the buffer. - If
offset > 0, WebGL skips that many bytes from the start of the buffer before reading the attribute data.
This value is always specified in bytes, not in number of elements.
- If
We will discuss this function again in the chapter RGB Triangle II so don't worry if you don’t fully understand this function yet.
For now, just understand that this function tells the GPU that for the attribute at location
a_position_location, it should read data from the buffer currently bound to gl.ARRAY_BUFFER,
and interpret that data as pairs of two numbers to form the attribute values.
7. Enable the attribute
Enabling the attribute means you are telling the GPU that this attribute is active and should be used during rendering.
To enable the attribute you call the function gl.enableVertexAttribArray:
gl.enableVertexAttribArray(a_position_location);
If an attribute is not enabled, the GPU ignores the buffer data associated with it and instead uses a default constant value for that attribute for every vertex.
For vec2 attributes like here, the default value is vec2(0,0), this results in gl_Position becoming vec4(0, 0, 0, 1) for all vertices, so all vertices collapse to the same
position — the center of the screen — and appear as a single point1.
8. Issue the draw call with the number of vertices you want to draw.
You have to draw 3 points, so issue the draw call with the last argument as 3
gl.drawArrays(gl.POINTS, 0, 3);
As promised in the last chapter, let’s continue the discussion on the arguments of the gl.drawArrays function.
I think that the first arg is quite clear, that is to say what you want to draw, and here its points hence it's gl.POINTS.
Let’s understand the second and third arguments with an example.
Suppose we have 10 points:P0, P1, P2, ... P9
If we issue the draw call:
gl.drawArrays(gl.POINTS, 0, 10);
WebGL will draw all 10 points, starting from P0 up to P9.
Now consider this draw call:
gl.drawArrays(gl.POINTS, 2, 6);
This tells WebGL to start drawing from the 2nd index vertex that is P2 and draw 6 points.
Hence it will draw the points:P2, P3, P4, P5, P6, P7
Now it should be obvious that the second argument tells, from which point to start and the third argument says that draw these many points from there.
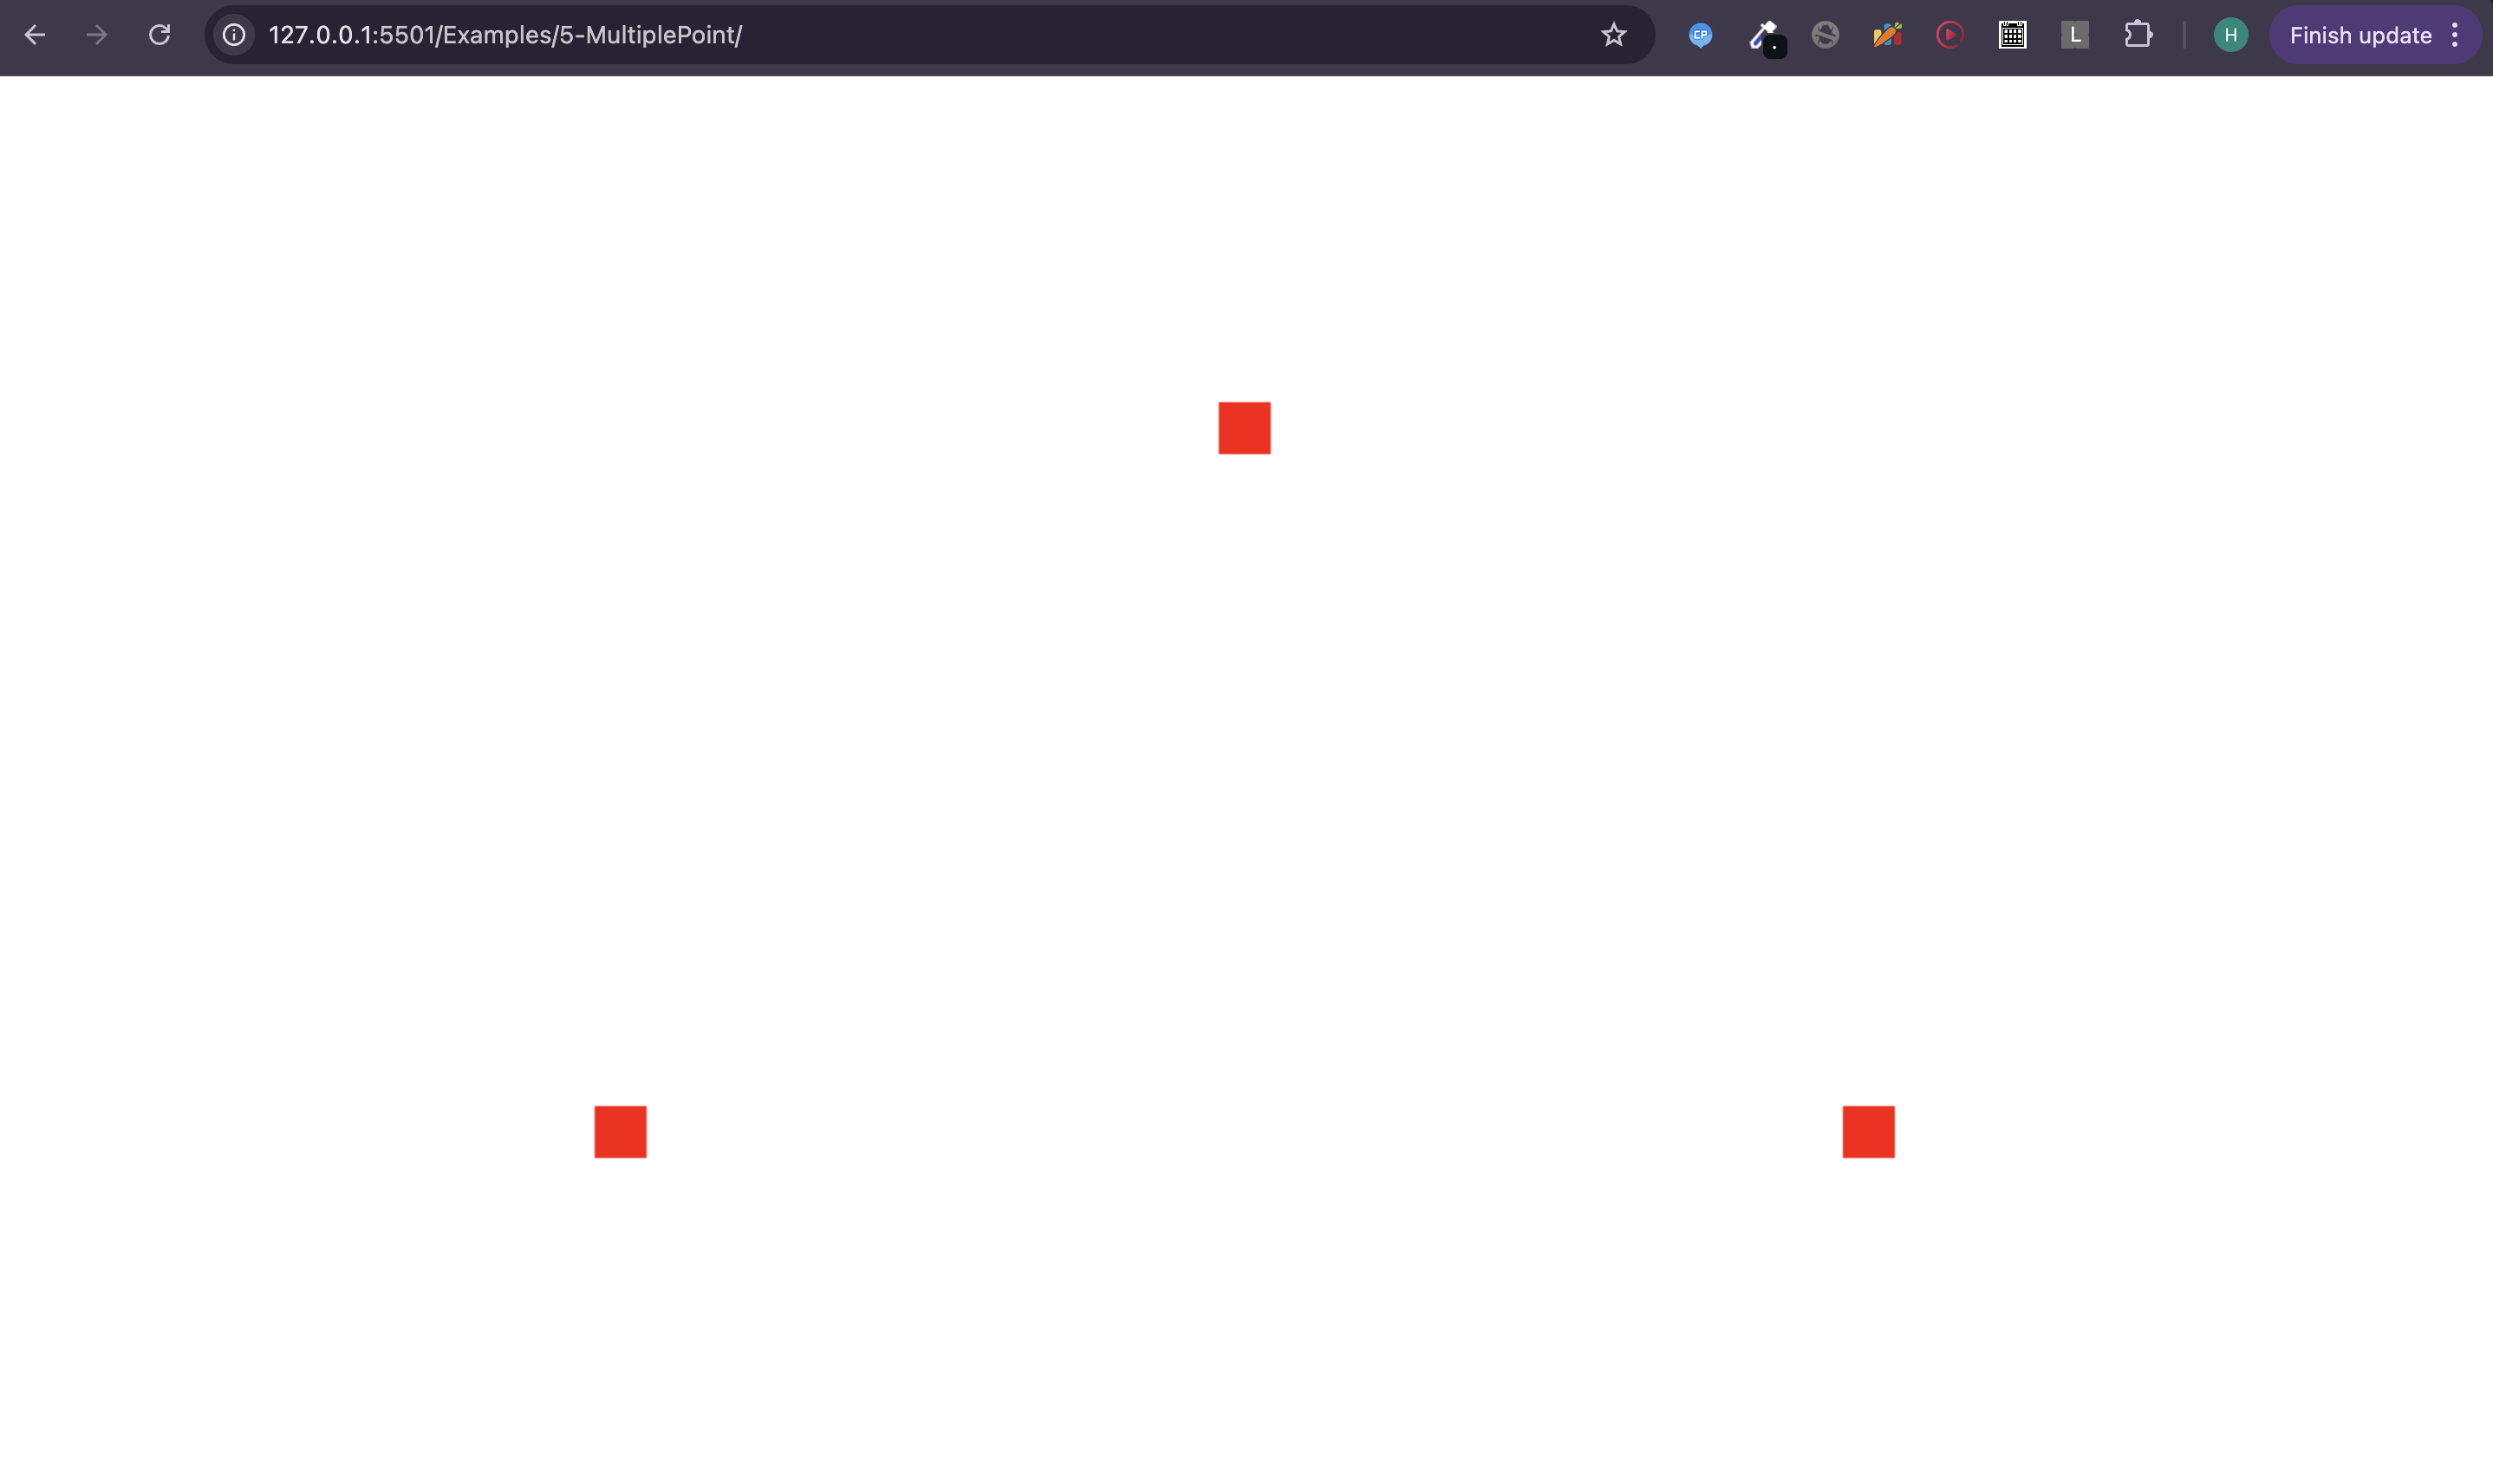
Now when you save your script.js and reload the browser window you will see something like this. And yeee! we have drawn multiple points.
Final Code
script.js
//Step 1: Set the viewport
const canvas = document.querySelector("canvas");
const gl = canvas.getContext("webgl2");
canvas.height = window.innerHeight; // For making the canvas full screen
canvas.width = window.innerWidth; // For making the canvas full screen
gl.viewport(0, 0, canvas.width, canvas.height);

//Step 2: Write the shaders
// vertex shader
const vertexShaderSource = `#version 300 es
in vec2 a_position;
void main(){
  gl_Position = vec4(a_position,0,1);
  gl_PointSize = 30.0;
}`;

// fragment shader
const fragmentShaderSource = `#version 300 es
precision mediump float;
out vec4 color;
void main(){
  color = vec4(1,0,0,1);
}`;

// Step 3: Compile the shaders
const vertexShader = gl.createShader(gl.VERTEX_SHADER);
gl.shaderSource(vertexShader, vertexShaderSource);
gl.compileShader(vertexShader);
if (!gl.getShaderParameter(vertexShader, gl.COMPILE_STATUS)) {
  console.log(
    "error while compiling the vertex shader",
    gl.getShaderInfoLog(vertexShader)
  );
}

const fragmentShader = gl.createShader(gl.FRAGMENT_SHADER);
gl.shaderSource(fragmentShader, fragmentShaderSource);
gl.compileShader(fragmentShader);
if (!gl.getShaderParameter(fragmentShader, gl.COMPILE_STATUS)) {
  console.log(
    "error while compiling the fragment shader",
    gl.getShaderInfoLog(fragmentShader)
  );
}

// Step 4: Create a WebGL program
const program = gl.createProgram();

// Step 5: Attach the shaders to the program
gl.attachShader(program, vertexShader);
gl.attachShader(program, fragmentShader);

// Step 6: Link the program
gl.linkProgram(program);
if (!gl.getProgramParameter(program, gl.LINK_STATUS)) {
  console.log(
    "error while linking the program:",
    gl.getProgramInfoLog(program)
  );
}

const pointsCoordinates = [
  0, 0.5, // First point
  -0.5,-0.5, // Second point
  0.5,-0.5, // Third point
];

const a_position_location = gl.getAttribLocation(program, "a_position");
// Create Buffer
const pointsBuffer = gl.createBuffer();
gl.bindBuffer(gl.ARRAY_BUFFER, pointsBuffer);
gl.bufferData(
  gl.ARRAY_BUFFER,
  new Float32Array(pointsCoordinates),
  gl.STATIC_DRAW
);
gl.useProgram(program); //Use the program before making vertexAttribPointer call I will explain this later in Webgl: State Machine chapter

gl.vertexAttribPointer(a_position_location, 2, gl.FLOAT, false, 0, 0);

gl.enableVertexAttribArray(a_position_location);
// Step 7: Use the WebGL program

// Step 8: Issue the draw call
gl.drawArrays(gl.POINTS, 0, 3);
NOTE: Use the program before making vertexAttribPointer call I will explain this later in Webgl: State Machine chapter